
(Long Post)
As our society’s interest in cycling has grown and my personal commitment has matured I began exploring ways of adding cycling to out of the ordinary parts of my life. I travel quite a bit, about twenty trips a year, and wondered if I could bike to the airport instead of taking BART, Supershuttle or a cab. A couple of years ago I made this a reality and ongoing commitment. It can be done and I now do it for almost all of my trips. How to get there at all, how to get there safely, and how to secure my bike for several days were the main issues I had to address.
Getting There: A Couple of Routes to Choose From
Both of the routes below begin at the corner of 24th and Church streets in Noe Valley. The first provides a longer, though flatter, workout with some off-road routing. The second route is the safest and shortest with a few more hills. Time of day, traffic and weather can play important factors in choosing either route. Car traffic is an issue either way you go and riding both routes at night will take you through areas with little or no street lighting. On the majority of the rides the prevailing winds come from the north or west so going to the airport is an easier ride than the return trip, but that is all part of cycling.
Route 1: Cesar Chavez to Bayshore and around Candlestick (15.0 miles)

Head south on Church Street, go left onto Cesar Chavez and navigate ‘the hairball’ (101 Freeway Interchange) to get under the freeway and onto Bayshore Blvd. If it is early in the day with light traffic I stay on Cesar Chavez past the 101 south freeway entrance and follow the road around onto Bayshore, but this is not a good idea with a lot of traffic present.
 Cesar Chavez under 101 to Bayshore Blvd
Follow Bayshore Blvd uphill past Silver Avenue to Paul Avenue. Take a left onto Paul Avenue and coast down to 3rd Street as it is fairly bumpy. (An alternate route at this point (saving about 2 miles) is to continue uphill on Bayshore, back under the freeway to the top of the hill and then down hill on Bayshore to Tunnel Ave. This route has the most hill and has a dangerous road crossing at the top of the hill.)
 Bayshore Blvd uphill to Paul Ave (recently repaved with bike lanes)
Cross 3rd Street and continue on Evans all the way around Candlestick. Follow the main road to the left under the freeway and past the Recology Center (smells a little bit rank). Go right on Beatty Ave and then left onto Tunnel Avenue.
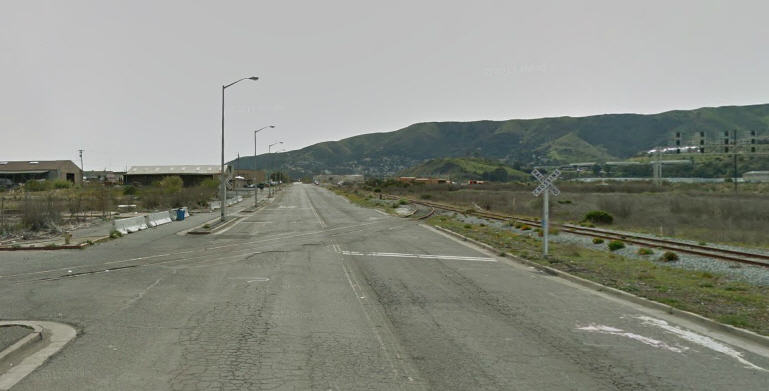 Tunnel Ave south to Lagoon Rd
Take Tunnel Avenue to Lagoon Rd where you go left around the lagoon with a right onto Sierra Point Pkwy, back under the freeway and onto Marina Blvd at the office park complex. Here is where the route gets tricky. Follow the road to the end or take a right into one of the building parking lots and wend your way to the parking area behind the buildings. There is a clear route to the far south end of all the parking where you will find a tiny ramp built for cyclists taking you onto a dirt path between trees and from there onto a wood bridge (just off to your right) across a small inlet and onto the backside of two hotel parking lots (also just off to your right).
Keep going south through the parking lots onto the access road which wends its way around to the east and then south again to meet up with Grand Avenue. Go right onto Oyster Pt Blvd and then take the next left onto Gateway Blvd. From here you stay on this road until it becomes South Airport Blvd which takes you directly into SFO. At the end of your ride stay to your left at the airport under the parking lot until you arrive at the Terminal G entrance located directly under the airport BART station.
 Arriving at SFO – Take Road under Bldg to the left to Terminal G
 Plenty of secure bike parking and a workstation for repairs, if needed!
Travel time for me along this route has generally been between 1 hour and 5 and 1 hour 10 minutes depending on weather and time of day.
Route 2: Geneva to Bayshore and San Bruno (13.0 miles)

Start off on this route heading south on Church Street and take it all the way to its end. Go left onto 30th Street and right onto San Jose Blvd. Follow San Jose Blvd uphill and around a long curve in a bike lane with soft post protection. Veer off to the right at the first exit option and then go left onto Arlington St steeply downhill to Bosworth Street. Go left and into the far right bike lane under the 280 freeway and then on up to Alemany Blvd. Go right on Alemany and take the generous bike lane on a slight uphill climb past Ocean Avenue to Geneva. Go left on Geneva, a busy intersection, across Mission Blvd, another busy intersection, and climb up to the Crocker Amazon playing fields. From there you get a nice 1.5 mile downhill ride to Bayshore past the Cow Palace. Take a right onto Bayshore Blvd and stay in the semi-protected bike lane south all the way to Brisbane. After Brisbane you climb one more hill and then coast along Bayshore Blvd downhill into San Bruno.
 Bayshore Blvd heading south to San Bruno
Stay on Bayshore through San Bruno down and under the railroad tracks. Go left at South Airport Blvd and take it under the 101 freeway. It will run around to the right to parallel the freeway after that and take you directly in to the airport.
 Final stretch along South Airport Blvd into SFO
Like the first ride, stay to your left at the airport under the international parking lot until you arrive at the Terminal G entrance located directly under the airport BART station. Travel time for me along this route has generally been between 55 minutes and 1 hour depending on weather and time of day.
Getting There Safely
I’ve now done over 40 trips along these routes (and a few other alternates) learning some safety tips along the way. In all of these trips I’ve had three mishaps, one flat tire and two crashes. Each crash was of my own doing, one from slipping on muni car sand at a corner and the other on a slick patch of mud during a rainy ride at the end of a long down hill into Brisbane. With the flat tire I was able to get my wife to pick me up and return home whereupon I took a taxi to SFO so I would make my flight, but I do carry a spare tube, levers, and a bike pump if I need to change on the go. I allow about 20 minutes of cushion to the timing of my ride so I can still make my flight if I need to fix a flat.
On many of my rides I am either going to or returning from SFO in the dark. I took my initial rides with basic LED lights on the front of the bike, but quickly found I could see nothing and had to ride slowly through the South SF/Brisbane wetlands. I invested in a Strella helmet mounted LED light sporting 300 lumens of output. This provides decent road illumination, but can be a little overpowering if you come upon anyone you know while riding (cover it with your hand).
 Strella 300 Bike Light
Because you are going to SFO for a trip you will generally be traveling with a heavier load on your bike than you are used to on trips around town. This requires more care in cornering, as I learned from my first spill, and heightened awareness of possible slippery spots in wet weather, my second spill. Under heavy load the rear end of my bike will scoot sideways when I hit a decent sized bump. There a plenty of bumpy spots along either route above.
I swear by rear view mirrors. If you don’t have one, get one. Once you use one for a while you will feel naked without it. There are a few places along either route that require merging or lane changes and I always like to know what the traffic is like behind me.
Securing Your Cycle at SFO
The SFO website provides decent information on where to park your bike and rules for long term stays. Since I generally travel United the Terminal G parking spot is most convenient. The Terminal A parking spot is similar to that for Terminal G. Upon arrival check in with the parking attendant at the kiosk. Sometimes the attendant knows why you are stopping by, but a few have no clue. In the kiosk right hand desk drawer there is a plastic sleeve with Bike Parking forms. You need to fill one out if you are parking your bike for more than 24 hours. You can park for up to 14 days. I generally add one day to my planned return date in case I encounter any travel delays (this has happened once to me). My typical business trips are 3 or 4 days in length.
The bike racks are located off to the left of the ground floor Terminal G entrance. It is well lit, open air, but covered from rain. There are security cameras everywhere and one or two police cars parked nearby. Pretty safe place to park. I lock my bike, bike seat, bike wheels and helmet to the provided rack and make sure to take everything else with me.
Packing It All In
I have always been a light packing traveler. I adhere to the travel mantra “Either it is carry on or it is lost”. In warm weather my travel load is fairly light, but during winter months packing has to be judicially thought out. For a typical business trip I carry one backpack and one pannier for carryon. The pannier has a 20 liter capacity. When it is full (for wintertime rides) it weighs about 20 pounds and this requires me to be sensitive to large bumps (or potholes) in the road. Between my backpack and pannier I can carry a second set of shoes, three pair underwear, one pair of gym shorts, two T-shirts, two additional pairs of socks, two shirts, a pair of pants, a sport coat and a winter waist length jacket. For business gear I carry a laptop, iPad and chargers along with other small items like pens, business cards and earphones. I often put one spare shirt and T-shirt in my backpack to save pannier space. I also carry a toothbrush, razor and comb, but do not place them in a Dopp kit or carrying case to save space. Finally, I tote the regulation less than three ounces of toothpaste, shaving cream, shampoo and deodorant. For trips of more than two days length I do laundry in my hotel room sink. This is quicker than you think and works well.
Handling Security and Prepping for Boarding
Recently, I qualified for TSA Pre and can sail through security. Prior to that the folks at TSA didn’t quite know how to deal with me. I would show up, fairly sweaty, in day-glo yellow or green shirts and lycra leggings. All alarms would go off when I went through the screening device since it detects the presence of liquids and pretty much all of my chest and back are wet. After my first few visits the crew got to know I was arriving, would ask me about my ride that day, but still take time to do a thorough pat down.
After security, I visit a men’s room and change in a bathroom stall into business clothes. I carry deodorant and a plastic bag to stuff my riding outfit in. Generally, I am good to board about ten minutes after going through security.
On return trips, often with a connection through Denver, I will change into my biking outfit before boarding my flight to SFO to save time. Flight attendants and passengers are sometimes taken aback by my garb, but then it really isn’t much weirder than many others who travel these days. On one trip last year I chose to change into my biking garb in the middle of the flight to SFO. Aside from the fact the bathroom is smaller than a phone booth (remember those?) I scared a number of people when I emerged looking quite a bit different than when I went in.
Trying It Out for the First Time
If you are motivated to try biking to SFO for a flight I highly recommend you do as I did and make a test ride one weekend during the day along either route or test out both routes to see which you like. Timing is important since you are catching a flight with a fixed time of departure. I aim to be at the Terminal G parking spot no less than one hour before my departure time and I get priority security clearance. You may want to allow more time, particularly for your first few rides. Try it out!


Pingback: Zero to 6000 in 5 Years | Stamats Post Scripts